Part 7

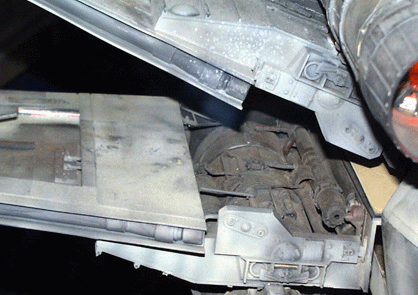
Here we go for the seventh installment: wings, engines and more. Since we are getting deeper into the area shown in the reference picture, I am leaving it up there.
NOTE: Save your files frequently. That way, should anything go wrong, you don't have to go back very far to restart your project.


1. The back edge of the wing needs a space into which to embed a tube (you can see that in the reference pic.)


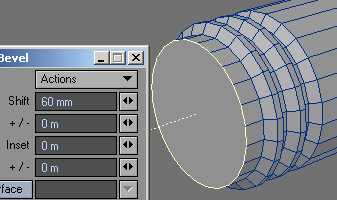
2. Since the wing edge is at an angle, the bevel will come out at an angle as well. To correct that, go to high magnification on one end, with the beveled polygon still selected, and slide it over a little. This is what you want to get. With one end corrected, the other end is done as well.

3. Make a disk and place it inside of the wing edge groove you just created. Side view.


4. What follows next is a long stretch of beveling, copying and pasting, stretching and compressing and extending. You can do as much or as little of it as you can handle, up to your references or imagination.


5. Instead of continuing with the beveling, I went and just copied the beveled polys to an empty layer, slid them over, and pasted them back in. A point merge deleted the extra points.


6. Select the now gap-free shapes and copy them to another layer. Then bevel the surface up.


7.
Here I just grabbed the points hit 'e' and extended the surface
a bit.


8. Then back to beveling.


9. Here I went back to the previously beveled flanges, copied them again, stretched them a little ('h') and slid them, in an empty layer, to the front of the tube. Then I pasted it back in and did a point merge, with the fixed level wide enough to grab the points on both sides and merge them.


10.
A little more beveling, then then beveling the tube all the way to near the
center of the wing.


11. At this point I wanted something other than just a plain tube. I went back and grabbed one of the previously beveled parts and, in an empty layer, slid the copied polygons to the end of the tube. Merged them, and then...
.


12. ...mirrored the tube in the X-axis. Sild the two halves together and did a point merge

13. If you followed along, you now need to tailor the length of the tube to the length of the croove in the wing. The problem is that the wing is at an angle, and therefore the tube will be too short, once put in place. I experimented a few times to get the right length.


14. Each time I swung the tube around, and checked. Once it was slightly longer, since it is easy, and even necessary to cut the ends at an angle, I entered a small number for the angle, and then tapped it into place.


15. Now all that remained was to cut the ends, and delete the unwanted parts.

16. There we are.


17. Because I thought it was easier to work in the wing engine box looking down into it, rather then up, I mirrored the whole thing vertically. Then I deleted the extra parts. This is what I mean.


18. Go to the end of the engine without the cone and select all of the polygons. Then using the wing box as a guide, make two cuts. Subsequently, select only the polygons the will be visible in the wing box and give them a name.


19. While you have those polygons still selected, make a copy and paste it to an empty layer. Then slice it up a little, such as this.

20. Shift-f and a little stretch and things look better already. Just raise the middle of the other part by hitting Shift-h and it too will get some volume.


21. While looking into the air-engine intake I noticed this. Can't let that happen. Select the offending parts of the wing extension and cut them to an empty layer, grab the bottom points and raise them above the intake diameter. Piece of cake. Now "glue" it all back into place and do a point merge.

22. One more nit-picky thing. Make a copy of the arched front panel of the wing box and in an empty layer flip it and then extend it slightly. Then paste it back. The box is now fully enclosed.


23. Now for the part we love to hate. Nurnies. I will take you through a few, but the rest is up to you. In the back profile of the engine box make a disk, and another, and another and... you get the idea. The more you make, the more interesting the object will look.

24. With all of them selected, let's bevel those things. First, slide them to one end of the box. I then added a little flange (bevel out: positive shift and a negative insert, then level, and then back down (positive shift and a positive insert), then bevel, or extend, them all the way to the end of the box.


25. After that is done, add a largish disk into the free space. Extend or bevel nearly all the way across the engine box, but hold short of the wall. There make a few repetitive extensions (I made 5). The go to MODIFY and bend. Place the bend-cursor in the center of the circles in the lower right view port. If the wrong thing bends, as it did for me, flip the view port from Back View to Front View. That worked for me. Then just gently push into the desired direction until the leading edge is where you want it. This ended up to be a sweet bend.
A tip on bending: look dead-on, if possible, at the tube to be bent. If the front bends, rather than the end, where you want the bend, undo the bend (or Ctrl-z) and switch the viewport view, e.g. from front to back, and repeat the process, and the bend will most likely be where you want it to occur.

26. Next, for a little detail on the space engine (I call the whole thing 'nozzle main' as you remember). We know what it really is, right? Make two cuts and a bevel or a Shift-f on one of the polygons. It adds a little control box sort of thing. Make sure the result is perpendicular to the engine body. You can do this several times.


27. Now for something I will show you once, after that you can repeat the anywhere, anytime for as many times as you see fit.
Let's say you want to create a wire bundle (or pipe) running from the side of the engine/wing box to the middle of the engine. Go to CREATE tab and Points. Then create a number of points between the two locations you want to connect. Then sequentially select the points (if not already still selected) and go to 'Make Curve' and create an Open Curve. Notice the diamond shape. It indicates the start of the curve. You can switch that by hitting 'f'.


28. Since the points come out exactly aligned in the top view, and they are to represent a wire bundle, in this case, I decided to make them just a little irregular. Were they pipes, of course we would want them to remain in one line.


29. The next steps serve to give the wire bundle (or pipe, as it may be) some volume. Go to a vacant layer and create the cross-section of whatever you want to build. In this case, I will create a small disk and place it precisely at the starting end of the curve polygon. Center the disk in ever viewpoint possible and even tilt it, as I did here, to adjust to the initial slope of the curve in every axis necessary. Then, with the curve in the background, go to MULTIPLY and Rail Extrude. Make sure the Oriented box is checked. Hit Ok and there it is, a wire bundle.


30. Hit 'q' and in the Change Surface panel, name the new polys 'wire'.


31. On the endpoints we want a couple of boxes to terminate this bundle. Do whatever pleases you here.


32. On the wall-side I just added a little box...and there it is.
In part 8 of this tutorial you'll finish wings, engines, and all of the rest of the goods.
(last review 27 AUG 06)
Created by Karl Stocker (pixeltek), a 3D hobbyist and occasional freelance artist. If you'd like to contact him, send email to: pixeltek@yahoo.com or visit his website at: www.cosmic-pearl.com