
BUILDING THE SPIDER
Spiders: You can let your imagination fly, from the mechanical to the fantastic, or you can pursue the real thing. Spiders come in an incredible variety of shapes, sizes, and textures, and you can get lots of ideas and inspiration here: Spiders , Spiders2, and the US Spiders ID Chart , as well as numerous other similar educational sites. Different spiders will have different proportions, color, and hirsuteness (hairiness). It's a simple model and a tutorial that should be fine for any novice Lightwaver. NOTE: Once you create your first primitive, hit < F2 > and the entire object will be precisely centered in all three axes. Since this is just one interpretation of a spider, you can use any guideline to improve or modify the actual shape, thinness or length of legs, size of the body parts (e.g. in some the forebody is larger than the abdomen), or use Sas-lite (part of Lightwave 3D) to add some hair. |
 |
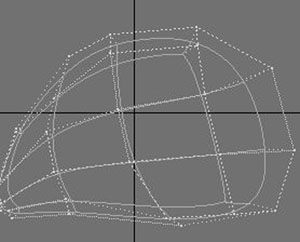
1. Create a box, subdivided as shown
 |
 |
2. Click on' Symmetry' (bottom of screen)..and
 |
3. ..use < Ctrl-t > to point edit the vertices until it resembles these three views
 |
4. Hit < Tab > to see the Subdivision Surface shape. You can reshape or refine your model right from here with 'Symmetry' selected and by grabbing thevertices with < Ctrl-t >. Same as your point editing in the polygon mode.
 |
5. Save your model, and open a different end empty layer (top right of screen).
 |
6. Create a small box, but give it zero depth.
 |
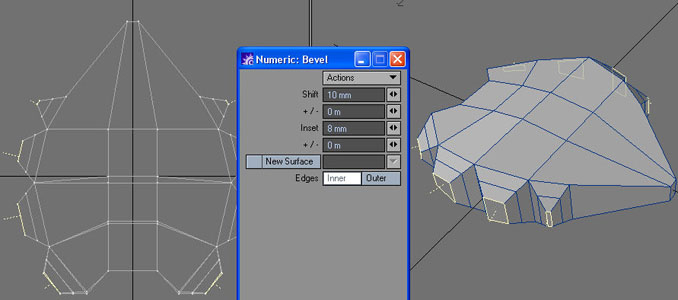
7. Select the square and go to Bevel < b > and < n >. The latter to bring up the numerical panel. Enter the values you see here.
 |
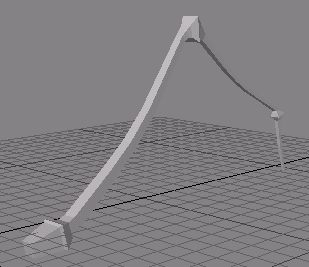
8. Close the panel and hit <Space>. You are now out of the Bevel mode. Look at the picture of the leg, and repeat Step 7, until you have something like it.
 |
9. Ok, you are now on your own. Once you have the leg finished, hit < Tab > and you can see what it will look like. Save the object e.g. Spider_1
 |
10. Hit < b > and < n > again. What you will notice is that the previous values are still there. You can go and click on 'Actions' and select 'Reset' and the fields are zeroed out.
Now enter the values shown. Close the panel and hit < Space >.
11. You get the idea. Now do all of the rest of the bevels. The good thing is, you have to do that only once. Later you'lll just replicate the legs, scale them, and position them.
 |
12. The finished leg: Point edited in a few places for the irregular look. You can see how it is bent in a few places. Select a pair of points, and then hit < t > and create the little bends in the sections.
 |
13. This is what you should see, then hit < Tab > to see the leg rounded. Save your work e.g. Spider_2
 |
14. For the forebody, you will do another block modeling exercise. Go to an empty layer and create a box.
 |
 |
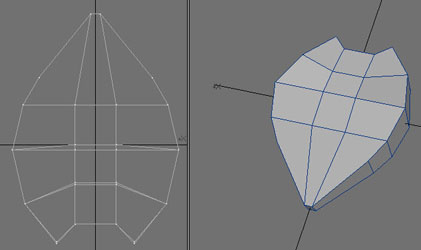
15. Hit < a > and it will center the box in the viewports. Now hit 'Symmetry' and then < Ctrl-t > and move pointsuntil you have a shape resembling this.
 |
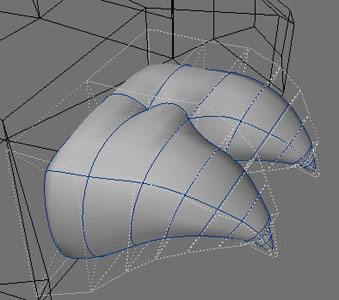
16. You should have something similar to this when you hit < Ta b >
 |
17. Hit <Tab> again, so that you can select (in the polygon mode) all of the squares (8), as shown. Spiders have eight legs, so we will have to have eight leg attachment points
NOTE: Symmetry is still on. Always be aware of that. It can cause some weird stuff, if you forget to turn it off.
 |
18. Now bevel (I'll say this for the last time - you know this) - Hit < b > and < n > and you'll notice that all of the selected surfaces are beveling.
 |
19. Bevel again, and change the values to suit. Exit bevel mode and point edit the surfaces to be more squared. Like this. Tab it and see everything round out.
 |
20. Widen the aftmost lag attachment point via point editing.
 |
21. Rotate the forebody by 180 degrees, and, with the abdomen in the background, slide it until it looks like this. Not too shabby, I say.
 |
22. Create thre fangs from a box, like this. The box will be just half of the final object.
 |
23. In the top view, point edit the shape until it looks something like this. I have the forebody in the background layer, just for scale.
 |
24. Do the same in the side view, and add some tilt to the thing - more point editing.
 |
 |
25. Select the little end polygon and do the two bevel processes < b > < n >, shown in these two illustrations
 |
26. Select and weld < Ctrl-w > the two points pairs, as shown, together. Repeat for the lower pair.
 |
NOTE: Make sure that you select them in the same order, for symmetry.
 |
27. In the Polygon Mode (hit < Space > until the coursor looks like an 'X'), check the stats panel. If you don't see it, hit < w >. See if there are any 1 or 2-Vertices polygons shown. Select them in the panel, and they will be high-lighted (as shown). The delete them < Ctrl-x >.
 |
28. In the side view, hit < Shift- k> and make a Cut as shown. This will give you a little step, once the fang is tabbed.
 |
29. Hit < Tab > and you have your fang with that little added step.
 |
30. A little clean-up. Hit < Tab > again, and in the top view, select the center points as shown.
31. Hit <v> and the Set Value window opens. Since it is already at zero in every axis, hit 'ok', and the selected points, if not exactly centered in the X-axis, will be moved there.
 |
32. Select the two remaining points at the tip of the fang. Hit < t > and while holding down the Ctrl key, slide them toward the center of the fang.
 |
33. Now all that's left is to mirror the fang. Select it, hit < Shift-v >, and the mirror mode is entered. Hit < n > and the numeric window pops up AND the object is mirrored across the X-axis.
If you need a different axis, select it, and the object to be mirrored will appear there.
34. Some of you will say - Wait! Why select the fang? True enough, but selection allows you to mirror just the selected part, and so you did it that way, just to learn that.
 |
35. Tab the fang, and you have this nice organic shape (easy to reshape if you like.
 |
 |
36. Selecting all of the parts and hitting < Tab >. Hit < Tab > again and save your work
 |
37. Hit < Space > go to the point mode. In the front (or back) view, select all of the points on one side as shown
NOTE: Make sure you don't delete points on the object's center line
 |
38. Hit < v > and 'ok' make half the spide's forebody and fangs collapse onto the X-axis.
 |
39. In POLYGON MODE, select the polygons along that center line.
 |
40. Now delete the center polygons (highlighted)
 |
41. Slide the fang a little bit away from the forebody front edge, and select the highlighted polygons
 |
42. Hit < Ctrl-x > and delete the selected polygons. Hit < Ctrl-s > and Save the object. Maybe as a new iteration, e.g. Spider_3
 |
43. Select these points (I went inside to out) and hit < Ctrl-w > and weld those points.
 |
44. Select the next pair in the same order (in my case, inside to outside) and weld them.
 |
45. Again with the lower points - same selection criteria as in the previous welding process.
 |
46. Ditto - do it again for the last pair of points
 |
47. The result of this is that the angs and the forbody are smoothly connected - hit < Tab > and have a look.
 |
48. This is an 'old hat' by now: Mirror the object across the X-axis
 |
49. Now go to the layer that contain the leg, you so painstakingly beveled. Keep the forebody in the backgound layer. You can Scale < Shift-h > the leg to suit you. Next rotate and move the leg to this position. Then in the sideview, rotate < y > the whole leg down, so that the tip is below the level of the spider's belly (to raise it above the ground level.
 |
50. Select the points as shown and then rotate < y > the selected points slightly outwad
 |
51. With the same points still selected, rotate them until they are in line with the leg.
 |
52. It should look close to this
 |
53. In Polygon mode, select the whole leg and copy < Ctrl-c > and paste < Ctrl-v > it back into the same layer. Repeat until you have four legs.
 |
54. In top view rotate and move the legs as you see fit
 |
55. You should have something similar to this
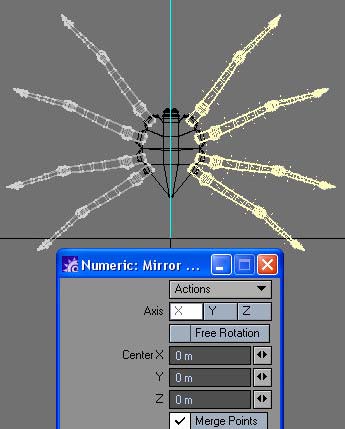 |
56. Mirror < Shift-v > & < n > the legs across the X-axis. You now see 8 legs, as advertise in nature's Spider Construction Manual
 |
57. Make a little Sphere, as shown. Keep the Forebody in a background layer
 |
58. Hit < q > and change the surface name to 'Eye" and give it color and smoothness
 |
59. In the sideview maneuver the eye ( - ball) to be partly inside of the forebody
 |
60. This is how that should look
 |
 |
61. Copy and scale the eye and place them around the Forebody, as suggested here
 |
62. Mirror them across the X-axis
 |
63. And this is the result
 |
64. Go to the layer that contains the abdomen, rename < q > the surface 'Abdomen'
 |
65. Go to the layer that contains the legs and rename < q > the surface 'Legs'
 |
66. Go to the layer that contains the forebody and rename < q > the surface 'Forebody'. You now have four surfaces, including the 'Eye'
|
67. Time to go to the Layout.
In case of questions or comments, contact me (Karl Stocker - aka pixeltek) at pixeltek@yahoo.com