Splines are fine for the Gokstad Viking ship

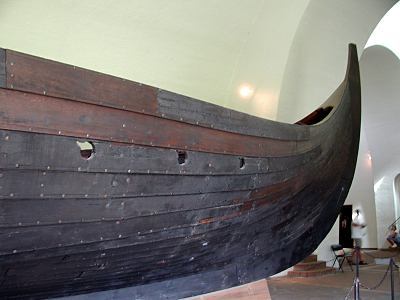
The business end of the Gokstad Viking ship in the Oslo Viking ship museum.
1. Open LW. Use 1m grid, hit the <0> key on the numerical keypad (num Lock on) and enlarge one of the viewports to lay the points out as I did. Be reasonably close, but don't get paranoid about the accuracy. All Viking ships were built one at a time, in different areas, usually for some rich Nordic land owner, and by different shipwrights. Probably no two were ever identical. In CREATE/points place them where I show them.

2. Copy the points <Ctrl-c> and paste them back <Ctrl-v>
and then slide them horiontally <t> to the right. Image
2 shows them as seen in the 500 mm grid.
NOTE: The tip is made up of four (4) points.

3. Next it's "connect the dots". In CREATE/Make Curve connect them with Open Curves. Make sure you use only one series of points at a time. You have enough points to end up with four separate curves. This gives us the keel of the ship. NOTE (Center Image): I squeezed the outside line inward, to have the whole thing come to a near-point.


4. To make the outer bow shape a little smoother, go to a different layer and create a disk. Don't bother to make it 3D. You'll just use it as a guide to slide the points into a more smoothly rounded shape. Delete the disk when you're finished.


5. Next, copy the upper inside curve to another
layer and delete the first two points.


6. You are now left with a shortened curve in a different layer, as shown below.

7. Copy that line, you know <Ctrl-c> and <Ctrl-v>
seven times. Each time slide it as I have indicate. That means that one of the
copies will be below the original one. The other six will be above the original
curve. You'll end up with this:

8. Now for some tedium (much more to come). Connect the dots vertically with open curves. To keep from getting snagged later, I decided to do it like this. The first row will be connected two dots at a time. The next row, all dots will be connected with a single open curve, and so on.


9. To more smoothly integrate the hull with the keel shape, drag (MODIFY/drag) the points of the first row forward, while holding the <Ctrl> key down.


10. Now go back to the keel. As you did with the hull, you will have to do with
the keel; that is, connect the points with open curves as shown. Use three curves
per four points, as you can see. This will build an outer "shell".
We don't need the inside curves, because once the keel is mirrored, that side
will be invisible. Also, in retrospect, make the keel about half as wide as
shown here. The reason is that once it is mirrored, it will double in width.

11. Next, select the last row of points in the layer with the hull. Even though I showed all of the points selected, omit the bottom one. We don't want the ship to leak.

12. Here the fun begins. Tedium maximus. In the front view, drag the selected points to the right. Here shown on the 1 m grid. Again, much adjusting will follow, so don't worry about extreme precision.

13. Do the same with the next row of points. The next row was one that had the points connected two at a time, and so you will end up with a not very smooth line. Not a problem. Go to the polygon edit mode, select all of the curves, and hit <Ctrl><s> and the result will be a continuously smoothed curve.


14. Repeat the process for every set of point/curves and apply smoothing, where necessary. Following the completion of the process, I went and moved some points around to make the horizontal hull curves a little more smooth. The problems are mainly in the front part. The result of my adjustments is shown below. Don't panic. This is a very forgiving modeler, and you can shift, nudge and slide things until you are happy with the result.
Save your file as ship_tute3.lwo (just to stay in line with my own designation)


15. Don't do this yet, but just for grins I went and mirrored the spline cage to get a look at the complete hull.


You can download the spline cage here: Viking1.zip
In part 2 of this tutorial you will create the patches for the hull and keel.
Created by Karl Stocker (pixeltek), a 3D hobbyist and occasional freelance artist. If you'd like to contact him, send email to: pixeltek@yahoo.com or visit his website at: www.cosmic-pearl.com