
Part 4
Here we go for the fourth installment and the cockpit. Looking back, I think I am making things easier from here on out.
NOTE: Save your files frequently. That way, should anything go wrong, you don't have to go back very far to restart your project.

1. Go into the layer with the upper fuselage and COPY and paste the polygons that provide an outline of the cockpit.

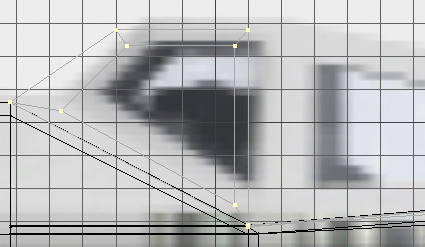
2. Using the S-view image in the background, select the points at the back-edge of the flat polygon and hit 'e' and extend them once, then hit 'e' again, and extend them once more, while roughly following the cockpit sideview. Stop where the bottom crease is.

3. Now SEQUENTIALLY select the points that will give you a side window plane and hit 'p' to create this polygon.

4. Use Bevel to get the window outline.
5. Using Point Edit, arrange the outline of the window. I used various sources to come up with a shape slightly different from the model used as backdrop. Keep in mind, it's someone's model and just a guideline.

6. Now, with the Bevel Tool, make the window opening.

7. After that, bevel that polygon to the outside, note the negative direction. We now have the start of an inside wall.


8. Delete the large polygon in the opening and select the inside corner points.


9. Yup, you gessed it. Some more point editing is in order. Use Set Value to align the points on the vertical front edge. Then do the others as close to what I show here, as possible.

10. Select the two upper points, hit 'e', and let Set Value (X = 0) extend the roof liner to the centerline. Pretty cool, eh?


11. Select the points of the front edge, four at a time and hit 'p' to create polygons that give us a solid look. Notice that in my case, the new polygon looks a little funky. I figured that there is an extra point in there, and did a point merge....


12. ...sure enough, the polygone looks great now. Then go and close the other four points. What you see here, are the leftover triangular artifacts from extending the roof liner to the centerline. No problem, just make them go away, and all looks perfect.

13. We need a back window. So go and bevel one.

14. Naturally, some more point editing will bring the window in line with our expectations. In the top view, slide those two points inboard...

15a. ...and align them vertically on the X-axis, using Set Value.

15b. There is an access door on the bottom slope of the fuselage. I used Bevel to pull the polygon inward slightly. Afterward, delete the center polygon. It would create a "wall" where we don't want one once we mirror the fuselage. Make whatever minor adjustments are necessary to clean this area up.

15. In the sideview, re-select those two points and carefully slide them as you see here. Use maximum magnification, to get the lined-up properly.

16a. After you use Set Value on the two inner points to get them to X = 0 m, switch to the polygon mode.


16b. Now it is time to bevel-in the opening. Delete the large polygon and the center polygon. You don't want the center polygon when you mirror this cockpit.

16c. Occasionally, in polygon mode, check the Polygon Statistics ('w') panel for any 1- or 2-sided polygons and delete them. Found one here, selected it and deleted it.


17. From the inside, start to fill in the gaps through selecting points and using 'p'.

18. I'll show you this once. In case there is no center point to complete a polygon, select the counterpart of the polygon and COPY and paste it to an empty layer. There you use Set Value to make the copied point jump to the centerline.

19. Now cut and paste it back to the original layer, and you have all four points you need to complete the polygon.

20. And now you're finished with the aft portion of the cockpit. Here is a look at the mirrored part.

21. Time to do the front part of the cockpit. Select the two polygons shown here, and copy them to an empty layer.

22. Flip them (hit ' f '), as you see here. Only to differentiate them from the aft cockpit, did I color them differently.

23. Ok, a couple to things:
a) Bring the cockpit edge to the new layer.
b) Use the four points highlighted here and create the large polygon.


24. We need that lower edge to give up the front points and a side point, that you will create by making this cut.

25. Since we need a point on the centerline as well, you need to do the previously described maneuver (copy, paste, set it to X=0, and cut and paste it back).

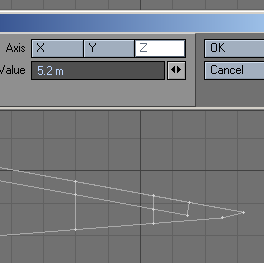
26. Flip that lip (select it and hit ' f '), and turn it into the bottom edge of the front cockpit.


27. Look at it from the inside and weld those two points. The direction is UP, making it shorter. Repeat the process with the centerline points.

28. Do a quick (fixed) point merge to clean everything up.

29. Delete the cockpit side-rail polygons. They have served their purpose. We used the just as guides.

30. Time to build the large side window polygon.

31. Now bevel yourself the front window area.

32. Using Set Value, snap the inside points to the X = 0 m line.

33. Back to the bottom. Ins the side view, slide these two points up the slope.

34. Do the same with the top points. I show the - 4 m position here, and that works, but in any case, you will have to go to the side view and carefully align the points with the slope.

35. Slide the side points inward in the Back View.

36. It should look like this, when finished.

37. Bevel the into the window space...

38. ...and delete the CENTER polygon.

39. Back to the bottom where you will make a cut like this.
40. Then a second cut about here:

41. To shape the window properly, we need cuts in both axes. Here is the other one.


42. Back to the top for similar cuts there.


43. ...and here.

44. Delete the covering polygons..

45. ..and triple the end polygon on the bottom wedge.


46. Now you are free to build the inside edge of the window, and fill the open spaces in once more.

47. Underneath: wait and create just the one polygon you see here.

48. Same drill at the top edge...


49. ..removing, rebuilding, and recovering.

50. At last the purpose of the second cut on the lower side is revealed. Use the remaining large polygon to bevel (inset) the side window opening.

51. Then bevel (shift) it inward.

52. Grab all the points on the bottom edge and hit 'e'

53. Then drag the edge inward as shown here.

54. This picture shows you exactly how far you want to pull the edge, until it meets with the existing back edge - and there you have it. A perfect fit. Almost finished now.

55. Fill in the highlighted polygons, and the front part of the cockpit is complete.

56. Time to put in the glass. Create the polygon by selecting the inner edge points and hitting 'p'.

57. And here we are, and there you should be...with the surface already assigned and textured as glass.

58. Repeat this process for all of the window openings, and you see that you are finished.

59. Through the glass darkly: the dark glass that I am using:
CHANGE: make the refraction index = 1.0 (NOT 1.5)

You can download the cockpit mesh here: Xwing3.ZIP
In part 5 of this tutorial you will create the cockpit interior.
Created by Karl Stocker (pixeltek), a 3D hobbyist and occasional freelance artist. If you'd like to contact him, send email to: pixeltek@yahoo.com or visit his website at: www.cosmic-pearl.com