Part 3
Here we go for the third installment and the lower fuselage.
NOTE: Save your files frequently. That way, should anything go wrong, you don't have to go back very far to restart your project.

1. Since the fuselage halves are somewhat symmetrical, let's start with mirroring the top fuselage long the Y-axis.

2. Cut and past the lower half to an empty layer.

3. Now go to a high magnification and slide the lower half against the upper half - shown in black outline in the background layer.

4. Using point edit (or compress with 'h'), make adjustments at the nosecone end to properly fit the lower fuselage into the nosecone.

5. If you already created the cockpit inside, prior to mirroring, then that space needs to be closed, and all unnecessary polygons removed.

6. Fully closed up again, it looks like this. You know how to do this, right? You take the point (where the black arrow is) that has no counterpart on the centerline, and copy it to an empty layer, then using Set Value X = 0, make it snap to the centerline. Then you cut and past its back to the original (in this case lower fuselage) layer. Then you select the points in sequence and hit 'p' to create a polygon.

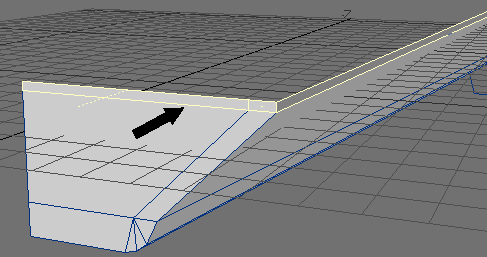
7.
Go to the stats panel and select all polygons to make sure none have been overlooked.
You know that when a polygon is facing away from you, unless it is double-sided,
it will be invisible. Delete all polygons that do not contribute to the lower
fuselage skin. Next select the edge that is highlighted here and delete it.

8. Now, using point edit mode, adjust the side view to the background image.
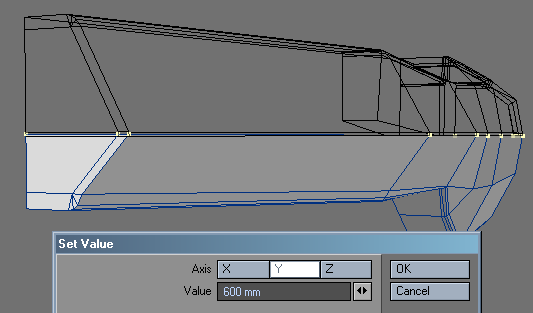
9. At this time, just to make absolutely sure everthing is aligned correctly, select all of the points along the upper edge and using Set Value Y = 600 mm, hit OK. Now we know exactly where the edge is located.

10. Hit the ' key to switch layers to the background layer, where the upper fuselage is located, and here select the lower edge points and use the same Set Value entry and hit OK. Now, both upper and lower fuselage edges are exactly aligned in their separate layers.
11. Create a top polygon here. The reason is that the lower fuselage has a verly small lip that is exposed and needs to be convered.

12. When you adjusted the top edge of the lower fuselage, the lower points did not move. They need to be slid outward to make a smooth side wall.

13a. Remember when you developed the top equipment deck? There is not such thing on the bottom fuselage, so all of that has to be closed. First delete the highlighted polygons.
13b. Repeat the process of beveling-in the back panel -.3 m (-300 mm) the same as you did with the upper fuselage. I assume that you can do that without any further instructions. Important is that both the upper and lower fuselage panels are exactly aligned, once you are finished with both of the panels. They need to fit precisely. Use the Set Value tool to get that acomplished (select the points to be aligned, and enter in the Set Value panel the new location, then hit OK and the points will be precisely lined-up.


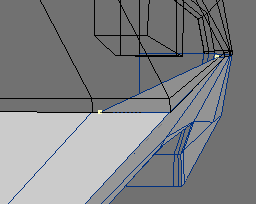
14. Now close the open area. Same technique as discussed earlier. Copy the middle point to an empty layer and use Set Value X = 0 to snap the point to the centerline. Then cut and paste it back to the original layer. Now you've got the point you need to build the two polygons.

15. Clicking on both layers, the upper and lower half of the fuselage are both visible and you can make any adjustments to get that small lip set up.


16. There is an access door on the bottom slope of the fuselage. I used Bevel to pull the polygon inward slightly. Afterward, delete the center polygon. It would create a "wall" where we don't want one, once we mirror the fuselage. Make whatever minor adjustments are necessary to clean this area up.


17. The actual access door outline. Go to another layer and use the Pen tool to draw this. It will become the stencil shape. Hit 'q' and call it Access Door. To simplify things, I took that newly recessed lower fuselage door polygon and pasted it into another layer. After drawing the door outline, cut and paste it into yet another layer, keeping the newly recessed lower fuselage door polygon in the background.

18. Swap layers ( ' ) and go to CONSTRUCT > Drill, select the 'Access Door' as Surface, and then in the Y-axis, (the direction along which we project the door outline) select 'Stencil' and hit OK.

19. And there you have it. The door outline has been stenciled onto the lower fuselage polygon.

20. Now select that new door polygon and use Bevel to extend it. Next paste the whole thing back into the lower fuselage layer. Hit 'm' to merge points. I like to use 'fixed' and enter a small value (e. g. 2 mm) to make sure all points connect properly.

21. One more center polygon to delete. Once the door is mirrored, you don't want that extra polygon.


22. At this point, I'd like you to go back for some additional work on the UPPER fuselage. They are, after all, parts of one thing. Eyeballing the top, looking at reference photos, grab these points and widen the upper deck slightly. Next, use Point Editing to get the side straight.

23. Here you create an opening in the side of the upper fuselage for the upper wing to be fitted in later. Select the large side polygon and use the bevel tool to do this.

24. Switch to Point Edit mode and align these points. You want an opening that extends to the baseline.


25. In the X-axis, you can make them even this way. I find Set Value an invaluable tool for all kinds of things. First, in the Back View, you snap them to -6.5 m, which makes the top point sit exactly above the one on the base line. Then, snapping them to Y = 0, they will both be at the bottom, giving you the opening you want.


26. At this time you will have to delete whatever blocks the bottom edge of the opening. You will at times find a very thin polygon after doing this sort of operation.

27. With both upper and lower fuselage layers visible, here you see the end-product of your labors (we'll do the cockpit next section)...Now would be a good time to save your file.

28. Back in the layer of one of the fuselage halves (I'm showing the upper half here), select the indicated points, hit 'e' and pull toward the centerline. That way we will have a ledge here. After you do one, complete the other half. Then make sure that they line up, as shown in the bottom image. Youy may, for convenience sake do this with both layers selected.


29. The next item is an access panel that extends across both fuselage halves. Select the indicated polygons.


30. Copy and paste those two polygons to an empty layer, then go to another empty layer, keeping the polygons in the background and using your pen tool (under the CREATE tab), draw this outline. As you can tell from the reference photo, the edges slope down toward the front of the craft. Hit 'h', place the coursor on the centerline and pull the edges down, while keeping the Ctrl Key depressed. This will become the stencil. Hit 'q' and name it Access Panel. Flip layers. Remember how to do that? Hit the ( ' ) key and you can toggle between layers.

31. Now the stencil is in the background and the two polygons are in the foreground. Go to CONSTRUCT Tab, select Drill, Stencil, and the surface to be stenciled = Access Panel. Then think of the projection/stencil direction. It's across the fuselage polygons, meaning you have to use the X-axis. Hit 'OK' and the access panel surface now is etched onto the copy of the fuselage polygons.

32. Next, either go to the Stats Panel and select the Access Door surface, or do so directly on the screen and use the Bevel Tool to raise them .1m (100 mm).

33. Delete the surrounding polygons and do a quick point merge to clean everything up. What you are left with is the access panel door, as a separate object, in the exact location where you want it on the fuselage.

34. Next you can cut and paste the now raised panel to one of the fuselage halves. Since the fuselage halves are in different layers, pick on. Mine is with the upper fuselage. It really does not matter which one you choose. It's either with the upper or the lower fuselage.


35. Another small post-haste adjustment. Grabbing these points use Set Value set at -3.4 m in the X-axis and click 'OK'. Not only is the ledge now wider, but all of the inner edges are exactly aligned in this way.


36. Back to the bottom half: Looking at the lower fuselage reference pics, you can see that the lower fuselage is not flat. Easy enough for us to adjust. Grab the points highlighted here and...

37. ...give them a little tug downward. Minor point editing in the access door area may be necessary to make it all look just right.
You can download the complete fuselage mesh here: Xwing2.ZIP
(last update 27 AUG 06)
In part 4 of this tutorial you will create the cockpit.
Created by Karl Stocker (pixeltek), a 3D hobbyist and occasional freelance artist. If you'd like to contact him, send email to: pixeltek@yahoo.com or visit his website at: www.cosmic-pearl.com